United Kingdom Tier 4 (General) student visa for Malaysian

It’s been a long while since I write my last article. Somehow my interest is to write on process of how to apply a particular visa from my home ground which is in Malaysia. Please bear in mind that I’m writing based on my experiences and I’m not some sort of specialist in visa application. I understand that it can be a tedious task to do especially if you want to travel to a country that required a visa. It can be easy for some countries you want to travel to and you can apply through some travel agencies, but to some countries you may need to apply it yourself and attend an interview personally. In particularly, countries like UK and US are the 2 example countries that you need to submit your visa personally. If you are willing to pay an agent, I guess your headache will be less in preparing the necessary documentation.

I recently decided to quit my full time job and follow my passion to study for a 9 months patisserie course in London. That explain why I write this article, in hope that I could document the process and help someone else who are going through the painful visa application process.

In most immigration websites, the long explanation can look complicated and confused. In this article, I’m going to summarise all that you need and process to apply for a UK Tier 4 (General) student visa. However, information provided is only for guidance and is updated as of 25 Mar 2015. The immigration might change the rules and process, hence I would suggest you to do a cross reference.

To be eligible:

You must:

  • have been offered a place on a course with a qualified education provider
  • have a CAS (Confirmation of acceptance of studies)
  • can speak, read, write and understand English
  • have enough money to support yourself and and pay for your course
  • have good health and clear from TB (Tuberculosis)

How do I apply?

You can apply for your visa up to 3 months before your course start date.

Documents preparation:

  • VAF9 application form.
    • Register online at https://www.visa4uk.fco.gov.uk.
    • Fill up the form online and print out.
    • If online application is not your option, you will have to print and fill up the Appendix 8 form. You just need either one of the form.
  • Visa fee USD 484 / £310. (This fee change from time to time. Do check the current fees here)
    • Payment can be made online after you fill up the online application form.
    • Alternatively, you can also pay via
      • Cash at Alliance Bank branches
      • Online transfer via Alliance Bank only to VFS (M) S/B for UK Visa fee, Account number 14185-0-01-001313-7
      • Bankers draft purchased from any bank payable to VFS (Malaysia) Sdn. Bhd. which is payable in KL only (no surcharge)
  • A current passport or other valid travel documentation
  • Previous passports (up to 10 years)
  • 2 passport size photographs (passport photo requirement)
    • 1 photo for visa application form
    • 1 photo for TB (Tuberculosis) test certificate
  • CAS (Confirmation of acceptance of studies) number
    • Your education provider will give you the details once you meet their requirements and paid full or first year of course fee.
  • Education supporting documents:
    • Original IELTS result certificate.
    • Original academic certificates/ transcripts that are stated in your CAS statement.
    • ATAS certificate (not required by everyone. Check if you need it here)
    • Photocopies of all certificates and transcripts.
    • All original certificates will be return to you together with your passport.
    • You will also need to proof other evidence stated in your CAS. (eg. Curriculum vitae, statement of motivation or any other documents used to obtain offer from your education provider)
  • Financial supporting documents:
    • You need to show that you have paid your course fee for the first year or a full course fee. (Stated in your CAS)
    • You need to show that you have enough money to support yourself for maximum 9 months.
      • If you will be studying in inner London you will need £1,020 for each month of your course. (Total £9180)
      • If you will be studying elsewhere in the UK,  you will need to have £820 for each month of your course. (Total £7380)
      • Ways to proof your financial:
        • Bank account in your own name:
          • This can be a bank statement or a letter from your bank showing/ stating that the funds required has been held for 28 consecutive days and can be withdrawn at any time ie. its a saving or current account.
          • The document must have bank letterhead with logo, your name, account number, type of account, date of statement and opening and closing balance for the last 28 days.
          • All pages in the bank statement must be stamped and signed by a bank personnel.
        • Sponsorship:
          • Evidence of an official financial sponsor or government sponsor.
          • In any other circumstances you must provide an official headed letter of confirmation bearing the organisation’s official stamp. It must show your name, the official financial sponsor’s name and contact details, the date of the letter, the length of the sponsorship and the amount of money that the official financial sponsor is giving to you or a statement that it will cover all of your course fees and living costs.
        • Money held by your parent(s) or legal guardian(s).
          • Student relying on money held by parents(s)/legal guardian must show that you are related to your parent(s)/legal guardian by providing an original legal document or a notarised copy of one of the following documents:
            • Birth certificate showing names of your parent(s).
            • Certificate of adoption showing names of both parent(s) or legal guardian.
            • A Court document naming your legal guardian.
            • You must also show that your parent(s)/legal guardian has given their permission for you to use this money by providing:
              • A letter from your parent(s) or legal guardian.
              • The letter must confirm the relationship between the student and his/her parent(s) or legal guardian; and that the parent(s) or legal guardian have given their consent to you for using their funds to study in the UK.
              • Letter of undertaking template
      • All bank statement must be no older than 1 month before the date of your application.
  • TB (Tuberculosis) test result
    • Malaysian must be tested for TB
    • Do make sure that you go for the test in approved test clinics. Else your application will be rejected.
    • For the test, bring along 1 passport size photo, passport and TB test fee.
    • Fee is around RM100-RM200.
    • Do call in to make appointment as the queue can be long (depend on clinics). Some take up to 2 weeks before you can attend to the test.

Once you have gather all documentation needed, pay your visa fee and book your appointment online. I personally encourage you to submit your application online and pay by credit card as it’s much easier.

On visa submission day:

VFS is an agency who process your visa application. All appointment and payment should be arranged with them.

There are only a few visa application centre in Malaysia. For the list, please refer to this website.

Do arrived at the visa application centre 15 mins before your appointment time and bring all related documents along. The x-ray you obtain from the TB test is not necessary to bring along.

Premium lounge service and priority visa service is available if you urgently need your visa. More details can be found here.

The visa submission is easy and it takes only 15 mins to get things done including submitting your biometric procedure.

You can choose to self collect your passport or pay a fee of RM40 to get it courier to you at the counter.

I personally advice if you are in an urgent need of your passport back, do go and collect your passport yourself when it’s done. The courier company they engaged with Aramex is really bad in service as they took almost 2 weeks to deliver my passport back to me.

You will receive an email when the decision have been made to your visa application. At this point, you will not know if your visa have been approved or rejected. The only way to know the result is to get your passport back. You have to be patience with this.

There’s no way you could call the VFS for status update. They won’t entertain this kind of request. All you can do is to wait until you get your passport back. At this point of time, try not to book any flight ticket until you get your passport else you will have to change your flight if your passport doesn’t get back to you on time. You should be getting back all your original documents and passports back in 15 days time (including Saturday and Sunday). If they take longer than this, you can however contact them using the online email form.

That’s more or less about it. Feel free to leave a comment if you have any questions regarding this topic. Again, I need to stress that I’m not an agent nor specialist in visa application. I can only answer what’s related to this topic.

Till then.. best of luck to those who are applying.

Cheers..


2013 New Zealand working holiday visa application

The quota will open on 22 January 2013 at 10:00 am (New Zealand time). Please follow the NZ immigration website for any updates.

http://www.immigration.govt.nz/migrant/stream/work/workingholiday/malaysiaworkingholidayscheme.htm

Best of luck to all who are trying to get a place. (-:


Quote of the day

Image


2012 New Zealand working holiday visa application

Mark your calendar! In just a few days, the 2012 annual quota of 1150 places under the Malaysia Working Holiday Scheme will become available from 10:00am (New Zealand time) on 4 January 2012.

For more details, visit NZ Immigration website

Good Luck to all who are applying and Happy New Year!!


New Zealand working holiday guide for Malaysian

The working holiday visa is currently available for citizens from countries listed below. If you are planning for a long trip to New Zealand, this visa is worth getting hold just in case you get short of money and would like to undertake casual work and travel around New Zealand for up to 9 months. It’s once in a lifetime opportunity and it’s only applicable for people that are below 30 years old. There are only 1150 places available yearly for Malaysian to stay and work in New Zealand, so make sure you make the most of it!

Citizens from the following countries can obtain a Working Holiday Visa:

Argentina, Belgium, Brazil, Canada, Chile, China, Czech, Denmark, Estonia, Finland, France,Germany, Hong Kong Special Administrative Region, Ireland, Italy, Japan, Korea, Latvia, Malaysia, Malta, Mexico, Netherlands, Norway, Peru, Poland, Singapore, Slovenia, Spain, Sweden, Taiwan, Thailand, United Kingdom, United States of America, Uruguay

To be eligible:

You must:

  • have a Malaysian passport that’s valid for at least 3 months after your planned departure date from New Zealand
  • be at least 18 and not more than 30 years old (before your 31st birth date)
  • not bring children with you
  • hold a return ticket or sufficient funds to purchase the ticket
  • have a minimum of NZ$2,250 available funds to meet your living expenses
  • meet health and character requirements
  • not have been approved a visa under a Working Holiday Scheme before

For more information on Malaysia Working Holiday  Scheme, please visit:

Malaysia Working Holiday Scheme

1 year before travel date

You should be having a strong interest by now in this working holiday scheme. But unsure where to start? Well, first of all, plan wisely. If you are keen to do this anytime soon, go ahead and apply the visa now. Don’t apply if you think you will only be able to do this in 2 years time. Doing so, you will waste the quota allocated for other Malaysians. The validity of the visa is 1 year and you must enter New Zealand before the expiry date. Your working holiday visa will activate on the first day you enter New Zealand and valid for further travel for 6 months from your first arrival. Your visa will allow you to leave and return to New Zealand multiple times for up to 12 months from your first date of arrival in New Zealand. You will also have the option to extend your stay for another 3 months provided you that you have worked in horticulture for a least 3 months.

How do I apply?

The application process is very easy. Just follow the instruction below (recommended):

  1. Register your details
  2. Pay a fee of NZ$175 using credit card.
  3. Submit and wait for approval (usually will take 3 days – 2 weeks)
  4. You will receive an email on your electronic approved visa
  5. Login to NZ immigration website and print out your visa

Alternatively, you can also apply manually by following the steps in the following website:

Steps to apply for a Working Holiday Scheme work visa

11-2 months before travel date

So you have the working holiday visa now. Travel date that you set might be still far away. But it’s good that you start planning now.

  • Plane tickets – The earlier you buy your tickets the cheaper the deal you may get.
    • AirAsia –  Budget airline AirAsia is flying from KL(LCCT) to Christchurch start 1st April 2011.
    • Jetstar – Direct flights to Auckland from KL by Jetstar will commence start 17th March 2011.
    • Singapore Airlines – Not budget, prepare to pay a little bit more.
    • Malaysia Airlines – Not budget, prepare to pay a little bit more.
  • Places to stay – It’s advisable to apply for YHA (try to apply the membership in Malaysia as it is cheaper than in New Zealand) and BBH membership to get discounted rate for hostels. BBH card is available in any i-Site centre across New Zealand.
    • Hostelling International – Find and book your hostels here with YHA membership.
    • BBH Accommodation – Find and book your backpacker style accommodation or hostels with BBH membership.
    • Hostelworld – A popular site to look for hostels.
    • Homestay – Rooms available as low as NZD70/week.
  • Seasonal Jobs – Many would worry about job security before they get there, especially for those with low budget and highly depending on seasonal job to fund their trips. However most employers would prefer you to be there when you apply for the job. Which what I’m trying to say is that, there’s no point you waste your time applying for jobs months before and when you are still in your home country. But it’s good that you prepare yourself by surveying about the jobs availability in different season and the regions that offer most jobs. Most seasonal jobs involved in horticulture industry and they have a great range of work opportunities to work in orchards, vineyards, farm or pack house.

Understanding the season in New Zealand will make it easier for you to know what kind of job you will work with and planning your travel date.

Summer (Dec-Feb) – Hawke’s Bay (Wine grapes, pears, apricots, plums, squash, asparagus, pumpkin, apples, peaches, nectarines, olives, sweet corn, peas, tomatoes), Waikato (Blueberries, onions, potatoes, asparagus)

Autumn (Mar-May) – Bay of Plenty (Kiwifruits, Avocados, Feijoas), Hawke’s Bay (Wine grapes, pears, apricots, plums, squash, asparagus, pumpkin, apples, peaches, nectarines, olives, sweet corn, peas, tomatoes), Nelson (Apples, blackcurrants, raspberries, pears, boysenberries)

Winter (June-Aug) – Bay of Plenty (Kiwifruits, Avocados, Feijoas), Marlborough (Wine grapes, sweet corn, olives)

Spring (Sept-Nov) – Generally a very low season for horticulture industry.

A few useful sites to help you find and learn about seasonal jobs:

  • Transportation in New Zealand
    • Bus
      • Nakedbus – New Zealand’s long distance bus network
      • InterCity – New Zealand’s long distance bus network
    • Car rental
    • Car Purchase
      • Trade me – A popular site to buy and sell anything in NZ.
      • Keep an eye to advertisements post at the supermarket and hostel’s notice board.
      • Backpakers car market – The Backpackers Car Market is for travelers to buy and sell to each other in a safe environment
      • Ellerslie Carfair – This car fair is in Auckland and is held on every Sunday. It’s a perfect place to either buy or to sell your car.
    • Campervan
      • Sunrise holidays –  Campervan and motorhome for rent in Picton, Nelson, Christchurch, Queenstown and others.
      • Camper Travel – Campervan for rent in Auckland, Christchurch, Wellington, Queenstown, Picton and Nelson.
    • Train
      • Tranz Scenic– Long distance trains
      • Maxx– Auckland suburban trains
      • Tranz Metro– Wellington suburban trains
      • Taieri George Railway– Dunedin’s prestige tourist train operating from the historic Railway Station.
      • Seat 61 – A beginner’s guide to Train travel in New Zealand
    • Ferry
  • Travel insurance for Malaysian
    • Chartis – Offer maximum days of coverage for a long travel period.
  • Money – It’s a requirement that you need to bring at least NZ$2,250 to New Zealand to meet your living expenses. You could opt to bring either cash or buying bank draft from local banks.
    • Bank draft – Can easily purchase from local banks. However, it require at least 5 days to deposit the money into your New Zealand bank account when you opening an account in New Zealand.
    • Credit card – Good to have 1 or 2 cards as backup, just in case you ran out of money.
    • Cash – Bring the minimum as required if you plan to work to support your travel. But no harm bringing extra.

2 months before till travel date

The date is drawing near. Excited yet? At this time, I will assume that you will already have settle all unfinished business, done with your study, quit your job and getting ready to be away from home for a along period of time. So in this section, I will basically just list down the things to pack to get you ready for your working holiday.

Things to pack

  • Documentation:
    • Print out your visa (not necessary as just in case).
    • Photocopy of your passport (not necessary, just in case of emergency use).
    • Photocopy of your driving license conversion letter. (For IRD application).
    • A few copies of resume for job application.
    • IRD application form (download form here).
    • Flights itinerary.
  • Your bag:
    • Toiletries – Try to pack at least 1 week supply. Things are not cheap here but convenient stores are everywhere.
    • Enough clothing to last you for at least 1 week. After that, you can do your laundry.
    • Wind breaker is useful here. Wear layers under the wind breaker if weather is cold.
    • Jackets to keep warm.
    • Microfiber towel. It’s easily dry up if you need to make a move last minute and it’s compact when you fold it up.
    • Hiking shoe and slipper.
    • Sun block and lotion.
    • Sleeping bag (not necessary unless you travel during winter time). Can also be purchase when you arrive in New Zealand. Please take note that some hostels doesn’t let you use sleeping bag on their bed.
    • Charges for your phone and notebook.
    • Notebook/Netbook, phone, mp3 players… etc.
    • Sunglass

If you still have any doubts or concern on your travel plans, feel free to leave your questions on the comment box below this post. I’ll try to reply to you soonest possible.

Happy travel! Let the adventures begin 🙂


Ampang lookout point

Ampang lookout point is one of the best place to enjoy a breathtaking unobstructed view of Kuala Lumpur city. There are a few restaurants operated by the locals serving mostly Western and local cuisine. A great place to hang out with friends and family.

The only way to get there is by car or cab. The road is winding, so do drive carefully. It’s a bout 30 min – 1 hour drive to reach the lookout point depending on the traffic congestion. The best time to depart from Ampang is around 5.30pm. Just in case you are stuck in the traffic jam and you might miss out the sunset when you reach the top 😀

For more information on Ampang lookout point and how to get there, please visit : www.lookoutpoint.com.my

Ampang Lookout PointStormy night over Kuala Lumpur city


Top 10 iPhone apps for travellers

Travelling was once expensive and difficult unless you have in-depth knowledge of the country that you are visiting. Most people would rely on tour agents to plan and provide necessary information. More often you will end up paying more. Thankfully, those days have ended. With more and more gadgets invented every day, I find that iPhone is so far the best gadget for me to help me manage my everyday plans. This include my travel plans. With the use of the helpful iPhone applications, you can now book your flights and accommodation, searching for the best food or pub in town, capturing beautiful pictures or you might end up somewhere unknown yet you will never be lost. All in this tiny little gadget. Below are my top 10 picks of iPhone apps to make your travel experiences a breeze.

WorldMateWorldMate – The most comprehensive travel app for your iPhone. Builds your itinerary automatically. Tracks your flights and pushes alerts if they’re delayed or changed. Shows you maps to your hotel and meetings.

Features:

  • Itinerary manager flights, hotels, cars, meetings
  • LinkedIn Travel Connections
  • Pushed Flight Alerts
  • Real-Time Flight Status
  • Flight Schedules Search
  • Smart Hotel Search and Hotel Booking
  • Maps & Directions to itinerary items
  • In-app Itinerary editing
  • Local search powered by Yelp
  • Limo reservations
  • Tip Calculator with Global Tipping Guide
  • Currency Converter with Exchange Rate updates
  • 5-day Weather Forecasts Globally
  • World Clocks
  • Itinerary Sharing
  • Online Trip Planner
  • Priority Customer Support
  • Ad Free Experience

Lonely PlanetLonely Planet Travel Guides – Looking for the ultimate guidebook? One you can slip in your pocket? Lonely Planet’s City Guides for the iPhone  give you interactive, personalised and fully searchable mobile access to Lonely Planet’s best-selling travel content.

Features:

  • No roaming internet costs – City Guides are designed as stand-alone apps
  • Enabled with GPS so you can see your current location and plot itineraries on dynamic maps
  • Hundreds of listings for bars, clubs, restaurants and more – filter them, mark them as a favourite or locate them by keyword
  • Detailed chapters on culture, history, food and art
  • Images from Lonely Planet’s award-winning photographers

HostelWoHostel Worldrld – Search and book over 23,000 hostels and budget properties in over 6,000 destinations worldwide. Read over 2 million user reviews, view property photos and description and book multiple rooms quickly and easily on the go.

Features:

  • Store bookings
  • Download hostels for your chosen destination that can be easily accessed in offline mode
  • Filter and sort your search for all types of budget accommodation – hostels, B&B’s and budget hotels
  • View hostels by map and see hostels in relation to your current location
  • Compile a list of favourites and save personal preferences all in one place
  • Multiple currency payment

Easy TrailsEasy Trails GPS – EasyTrails GPS is the application for outdoor experiences that users trust. With a tone of features, the EasyTrails GPS app provides everything that outdoor enthusiasts need and want, including great trail sharing functions.

Features:

  • Multimedia-waypoints: add photos and text to your trails
  • See the direction and the distance to a target waypoint
  • Define a proximity alarm around a waypoint
  • Share tracks to free online services in one touch
  • Follow a route
  • Real-time data as speed, average-speed, altitude, bearing
  • Maps (street  map/satellite/hybrid)
  • Charts (elevation profiles)
  • Compass
  • High battery duration (record on standby)
  • No limit on length or time for tracks
  • Select between metric or imperial measuring system
  • Intuitive user interface
  • Do not require internet connection
  • User EasyTrails GPS while you are listening music from the iPod application

Panoramatic 360°Panoramatic 360° – Panoramatic 360 lets you creat panoramic photos with iPhone photo camera or with the photos in the Photo Album. Panoramatic uses iPhone gyroscope feature to automatically take pictures for you (works on iPhone 4 and 3gs). The panaromic photo is build with high-resolution images and saved in the internal Album, so to keep the real size.

Features:

  • Output resolution higher than other panoramic application
  • Auto exposure and vignette correction for perfect panoramas
  • Simple and intuitive interface
  • portrait or landscape mode
  • Automated photo stitching
  • Autosave with restore capabilities
  • Automated 360 panoramas creation
  • Add photos on the left or on the right side of panorama
  • Localize the panoramic photos on the map
  • Internal Album integrated with iPhone/iPod Touch Photo Album
  • Fullscreen visualization of panorama
  • Real 3D VR visualization on 360 panorama
  • Send panoramic photo via email, Facebook or Wi-Fi

Super Camera 2: All-in-1Super Camera 2: All-in-1 : How many camera apps do you have on your iPhone? One? Two? Three? or even more? Now only ONE will be enough. Super Camera will cover everything you need and more than all your cameras have done.

Features:

  • 25 Photo Filters
  • 15 Photo Frames (updated!)
  • Up to 4x Digital Zoom
  • 3 Burst Shots
  • Self-Timer: 5~20 seconds delay for self-taking pictures
  • Anti-Shake: stable shooting with the gravity sensor
  • Anti-Shake Gauge
  • Tap to Focus
  • Full Screen Shutter
  • Full Screen Viewfinder
  • Guide Lines: 3×3 grid for better shots
  • Flash: Control bar up to +- 3 EV (Exposure Value)
  • 4 Resolution Options: S 480×320, M 900×600, L 1500×1000, RAW
  • Compatible with iPhone 3G/3GS and iPod Touch
  • Battery State
  • Thumbnail View: ‘Load’ button shows thumbnail of what you’ve just taken or saved.

iLoaderiLoader : The best Facebook batch photo and video uploader. If you use Facebook then you will love iLoader. iLoader is by far the easiest and fastest way of uploading photos and videos from your iPhone.

Photos Features:

  • Add photo captions
  • Tag friends in photos
  • Smart friends bookmark speeds tagging
  • Swipe & inch photos to view in more detail similar to built-in-photos app
  • Rotate photos before upload
  • Create new photo albums and set privacy from within iLoader
  • Upload photos to existing photo albums
  • Batch upload selected photos to Facebook in one shot
  • Show progress when uploading so you know exactly what is going on

Videos Features:

  • Add video titles and descriptions
  • Trim and edit videos
  • Playback videos to make sure they are perfect before uploading
  • Set privacy before uploading
  • Batch upload selected videos to Facebook in one shot
  • Show progress when uploading so you know exactly what is going on


Oanda Currency ConverterOanda Currency Converter : Convert exchange rates for over 180 currencies and 4 metals. Type conversion amounts using a custom big-button keypad.

Features:

  • Reliable rates
  • Adjust rates to what you’re being charged
  • See buy and sell rate details
  • Keep your frequently used currencies on quick access
  • Access obsolete currencies

TangoTango Video Calls : Tango brings you free, high-quality mobile video calls over 3G and Wi-Fi! tango is an entertaining video calling service that connects people around the world in an exhilarating new way. It’s easy to use and it works. Tango will change the way you communicate everyday, stay connected and share special moments as they happen. Whether saying goodnight to your kids while traveling on business, needing advice from your best friends while shopping, or saying I love you to your girl/boyfriend studying abroad, Tango for all your calls because you never know where your conversations will take you.

Features:

  • Free video calling to your friends and family around the world, wherever you are
  • Call between iPhone and other smartphones on 3G or Wi-Fi
  • Works on iPhone 3GS and iPhone 4
  • Populates Tango Contacts automatically from existing phone contact list
  • Invite friends and others by e-mail or text
  • Switch cameras and swap screens to show what is around you
  • Move between video to audio and back to video
  • Simple and easy to use
  • Create an account in less than five seconds

TranslatorTranslator : This app translate and speaks 53 languages. Incorporating the functionality of a language dictionary, voice pronunciation and mobile translator. It’s an easy to use language translation application with multi-lingual user interface. With an internet connection, you get integrated Text to Speech technology making even the most difficult languages easy to pronounce. From New York to Tokyo, Beijing to Bali, with Translator you’ll never be lost in translation again!

Features:

  • Translate words or sentences in 53 of the world’s most used languages
  • Speaks in English/French/German/Spanish voices
  • Simple, fast and accurate translation
  • Email translation
  • Fast language translation and language switch
  • Fast landscape keyboard
  • Edit existing translations
  • SMS-like user interface
  • Full screen mode for translations

19 days around China

The 19 days around China plan started 1 year before my travel date. AirAsia was offering zero price tickets to a few popular destinations. That’s when I manage to grab 2 tickets at zero price (pay only the airport tax) for myself and one of my friends. We ended up paying only RM300 for the return ticket from Kuala Lumpur to Tianjin each. Pretty good deal isn’t it? Due to the heavy web traffic in AirAsia site, the tickets were snapped up fast and the price keeps increasing. Time were limited for us to survey which is the best month to visit China but we ended up choosing Spring time. We thought it wouldn’t be too cold nor too hot to visit during this time and hopefully the flowers will start to blossom. So we have chosen 13 March – 31 March 2010.

3 months before the travel date, we were trying to plan as much as we could since this is our first long holiday trip. From identifying which city to visit to shopping for necessary gadgets and clothing for our trip. We don’t really like the idea to involve tour agent as it might end up too costly and there’s no freedom in where ever you wanna go. So we decided to do a backpacking trip.

Our initial plan is to include Tibet in the itinerary but unfortunately it was closed in the month of March to visitors due to the move to avoid a repeat of the bloody protest back in 2008 on the March 10 anniversary of the 1959 uprising against Chinese rule.

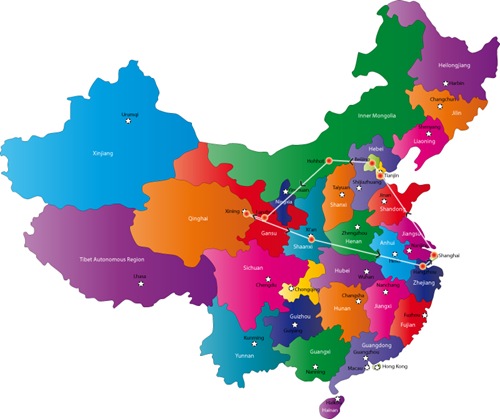
We ended up visiting 9 wonderful cities in China. Tianjin –> Beijing –> Hohhot –> Lanzhou –> Xining –> Xian –> Suzhou –> Hangzhou –> Shanghai.

China map with province

China map with province

Tianjin

We flew into China via Tianjin from Kuala Lumpur. Nothing much to do here so we decided not to waste time and head to Beijing once we touch down. To travel to Tianjin, take a 45 mins bus drive from the Tianjin airport to the Tianjin train station. The bus station is located just right in front of the airport exit/entrance door. There’s a small counter where you can just grab your ticket and hop into the bus. The bus will stop at the roadside somewhere near the train station. Follow the locals if you don’t know where is the train station or just ask around and they will guide you to the train station. We took about 5 mins walk to reach the ticket counter where we purchased our ticket for RMB58 each. We doesn’t wait long for the train as the train arrives every 10 mins and it took us only 30 mins to arrive in Beijing.

Speed Train

Speed train

Beijing

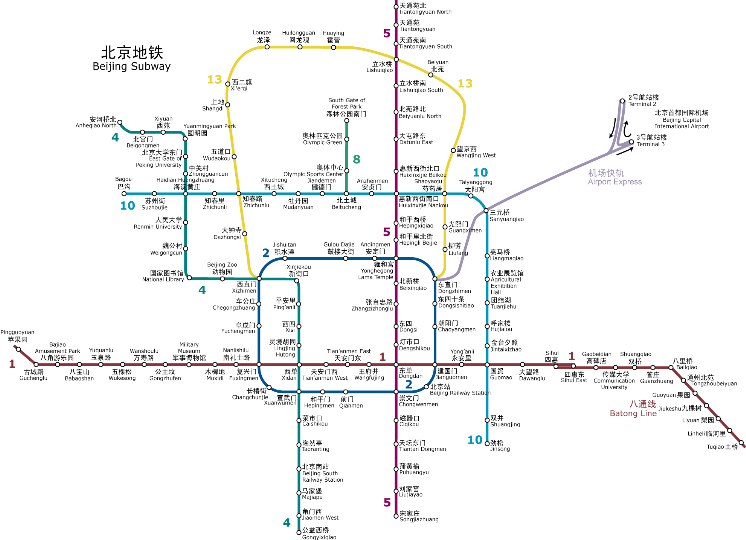
We arrived in Beijing at a very rush hour of 5pm.  The weather was very cold. It was about 10°C in temperature.  We have a dinner appointment with a friend at 7pm and thought that taking a cab would be the fastest way to reach our hostel to drop our backpacks. But we were wrong. We were stuck in the jam in the middle of the city for about an hour. Our first 3 nights hostel is at Houhai Courtyard Guest House which is located in Sanbulao Hutong. The hostel is reasonably clean. They have a nice courtyard but it was too cold for us to chill or hang out there. The hostel staff doesn’t really speak English but thanks to my friend who can speak decent Mandarin. We quickly check in and drop our backpacks, refresh ourself and head out to meet one of my friend. Knowing that it’s going to be very jam out there, so we decided to take the subway. We find our way to the nearest subway station which took us for about 20 mins walk. One thing about Beijing subway, it is very cheap! With just RMB3 one way, you can go anywhere around Beijing. It doesn’t matter how far or how near you go, the price is the same. It may be crowded at times, but it’s absolutely safe and convenient.

Beijing subway map

Beijing subway map

After all the rush, we finally arrived at DaDong restaurant which located at the 5th floor of Jin Bao Hui Shopping Mall in Wangfujing. All the way to Beijing, one thing you must not miss is to try the Peking Duck (Beijing roasted duck). DaDong is known to be the most famous restaurant to serve the best Peking duck in Beijing. It’s recommended to book for a table few days before your arrival to avoid any disappointment or long queue. Expect to spend about RMB200+ per person as the food does not come cheap.

Address in English : 5th floor, Jinbao Dasha, Jinbao Jie, Dongcheng District
Address in Chinese : 东城区金宝街金宝大厦5层
Contact number : 8522 1234
Business hour : Daily 11am-10pm

Preparing Peking duckPreparing Peking duck

Chef at work, preparing the Peking duck

Cold beefPeking DuckSugar coated apple

Cold beef as starter, the famous Peking duck and Sugar coated apple as dessert

Our second day in Beijing gave us a little surprise when we woke up in the morning. It was snowing when I peep outside the window at 8am. The roof, tables and benches are covered by white snow. Snow flakes falling, and to be honest, this is my first time I experience the real snow! It was supposed to be spring time but it was so cold in the northern part of China that it’s still snow. Guess I must be lucky that arrived at the right time. 🙂

Houhai CourtyardSanbulao Hutong

Houhai Courtyard & Sanbulao Hutong street

We took a brisk walk down the street to find some food for breakfast. We found this little shop selling Chinese doughnut and we decided to try it out.

Fried RiceChinese doughnutMinced meat noodle

Fried rice, the Chinese doughnut and minced meat noodle

After we were done with the breakfast, we then make our move to next the destination. Tian’anmen Square and the Forbidden City. We took the subway and stopped at Tian’anmen West station. Within walking distance, we walked towards Tian’anmen Square. The walkway was very slippery due to the melting snow but we did enjoy our walk in the cold weather and the walk way view was just superbly stunning. Trees, rooftop, walkway were all covered with white snow which gave me a good opportunity to take pictures. In about 10 minutes, we arrived at the Tian’anmen Square. The snow fall were getting heavier, hence we did not spend much time hanging around the square. We quickly take a few shots of the gate and then we moved into the Forbidden City.

History and related links on Tian’anmen Square:

Tian'anmen walkwayTian'anmen square

The walkway and Tian’anmen Square

We arrived at Forbidden City. Tiananmen Gate is the main entrance although not an actual part of the Forbidden City. The entrance fee to the Forbidden City is RMB40 during the off-season of November 1 to March 31 and RMB60 during the peak season of April 1 to October 31. There are many guided tours that could take you through the Forbidden City. You can also opt for audio tour guide. But for me, I have downloaded the Forbidden City Tour Guide to my iPod Touch to guide us through. These are ideal because you get to learn about the palace and see the best parts that you may not be aware of on your own. We passed through Meridian Gate, and entered the main palace’s courtyard. As we travel through the courtyard, we came across amazing bridges and gorgeous gardens.  Some top spots to see include the Gate of Supreme Harmony, Hall of Supreme Harmony, Palace of Heavenly Purity and the Gate of Divine Might.

forbiddencityimperialhall

The Forbidden City and the Palace of Heavenly Purity

There are many royal gardens that flank the Forbidden City. Beihai Park and Jingshan Park are two of the most popular park that should not be miss. They represent historic places on their own where history has been made.

Jingshan parkJingshan ParkJingshan Park

Jingshan Park, the spot where the last emperor of the Ming dynasty hung himself, and a lady singing and dancing at the park


to be continue…